New Sale (Manual Entry)
Create a sale from a form rather than the live checkout screen — walk-in and credit sales, discounts, tax, shipping, and payment all on one screen.
A manual-entry alternative to the Checkout Screen — useful for entering a sale after the fact, or when you prefer a form over the scan-and-add flow.
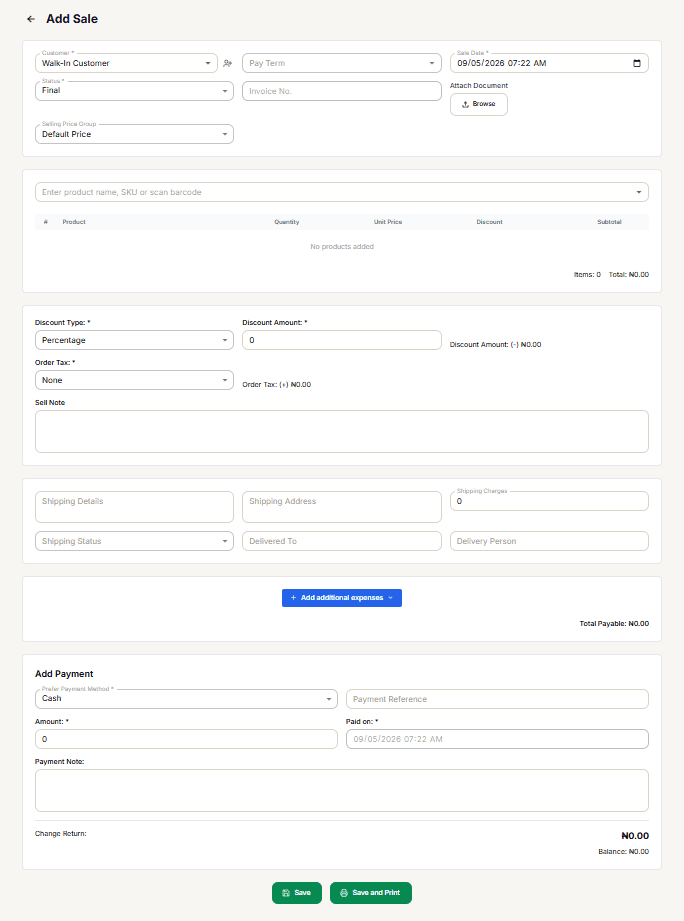
Set the sale details
- Customer — defaults to Walk-In Customer. Search and select a registered customer instead, or use the + icon next to the field to add a new one without leaving this screen.
- Pay Term — None, Net 7, Net 15, or Net 30 Days. Only relevant for a credit sale — leave as None for cash.
- Sale Date — defaults to now; change it to backdate or log an earlier sale.
- Status — Final, Draft, or Quotation — saves this as a completed sale or as a Draft / Quotation instead.
- Invoice No. — always auto-generated; this field is disabled, you can't set your own.
- Attach Document — optional file attach (PDF, CSV, ZIP, Word, or an image).
- Selling Price Group — defaults to Default Price. Switch it to price this sale from a different tier — see Selling Price Groups.
Changing the price group after you've already added products live-recalculates every line item to that group's price — a banner confirms the switch and that item prices were updated.
Add products
Type into Enter product name, SKU or scan barcode to search, or scan a barcode directly into the field. Each match you select becomes a new row with Quantity, Unit Price, Discount, and Subtotal — all four are editable per line. Items and Total just below the table update as you go.
Apply a sale-wide discount or tax (optional)
- Discount Type — None, Percentage, or Fixed — enter the value in Discount Amount.
- Order Tax — None, VAT 7.5%, or VAT 5%.
- Sell Note — optional internal note on the sale.
Add shipping details (optional)
For a delivered (rather than picked-up) sale: Shipping Details, Shipping Address, Shipping Charges, a Shipping Status (Ordered / Packed / Shipped / Delivered), Delivered To, and Delivery Person. Leave the whole section blank for an in-store sale.
Add expenses (optional)
+ Add additional expenses reveals a small table of up to 3 expense name/amount pairs (e.g. transport, loading) — not an open-ended list. Each one increases Total Payable.
Take payment
- Payment Method — Cash, Card, Bank Transfer, Credit, or Cheque. Unlike the live Checkout Screen, there's no split-across-methods option here — pick one.
- Payment Reference — optional, for a transaction ref, receipt #, or cheque #.
- Amount — how much is being paid now; can be less than the total for a partial/credit payment.
- Paid on — mirrors Sale Date and isn't independently editable.
- Payment Note — optional.
Change Return and Balance update as you type — Change Return is what's owed back on an overpayment, Balance is what's still owed on an underpayment.
If Amount ends up less than the total, a real customer must be selected — not Walk-In Customer. The sale is rejected with "A customer must be selected when the amount paid is less than the total (outstanding balance)."
Save
Save records the sale. Save and Print records it and opens the receipt for printing.
Need to change something after saving? A finalized sale can only be corrected with Void, a Price Override, or a Return — not by editing or deleting it directly.